How to Sear
I would say that at least 3 out of 5 dishes I make, require I sear something. There are 1,000s of cooking techniques, with more invented all time. No one can know them all, but everyone, that has any desire to cook at all, needs to know how to sear. Most of the time when I talk about searing, I’m referring to searing proteins – chicken, pork, beef, fish, etc…but there are times when you’re going to want to sear vegetables, and even starches. The common motivation for searing all those foods, is to get the outside exposed to very high heat, so the sugars and proteins caramelize, becoming stronger in flavor, and actually crispier in texture - without overcooking the center. In this recipe video, and below, I explore the basic methods for searing, expose a couple myths, and discuss the biggest reasons for searing. Hope you find it useful.
First, the Big Searing Myth- Searing “Seals in the Juices” – Searing does not seal in anything. Juices will evaporate or run out of a piece of seared meat, just as easily as an unseared piece. Searing does allow you to nicely brown the outside of the meat, without over cooking the meat; which makes for juicy meat – but that’s just good cooking technique – not a magic seal
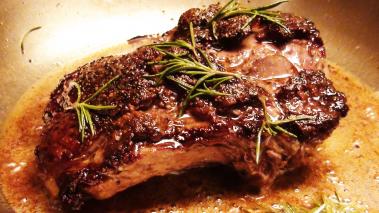
The big reason for searing meat, is when you want to get a surface area that is golden brown and caramelized without overcooking the interior. The easiest example to talk about is Steak. Good steaks (in my opinion) have a crusty, browned exterior, with the fat rendered down to where it’s crispy and delicious, while keeping inside a barely warmed through medium rare, running with delicious juice.
In other words, the outside is very thoroughly cooked, while the inside is just barely cooked. The problem is the longer you cook the outside, the longer you cook the inside…and instead of the contrasting doneness, you just get a thoroughly overcooked steak. Searing, through the application of very high heat, and the right techniques, gets that outside layer cooked in so short a time, the inside can stay more rare, tender, and juicy.
Sear whenever you;
- Want to keep the interior of the meat less cooked than the outside
- Want to develop greater flavor through caramelization/browning of the meat
- Want to create a crispier texture on the outside of the meat, like when you have some fat to render
How to Sear
Searing requires three things:- High Heat: You can’t sear at 200 degrees. You can’t sear at 300 degrees. To get a good sear you need to be closer to 500.
- Direct Heat: You can’t sear with indirect heat…like putting a raw steak in the center of a 500 degree oven. You need directed heat, like you would get laying the steak in a pan, or directly over the flames on a grill
- Time: Searing does happen quickly, but quickly is measured in minutes not seconds. Too often I see people start a sear and then pick up the meat 20 seconds later. You just took it off the high heat, and it’s not longer direct heat. You are ruining the sear. You have to leave the meat alone for at least a few minutes.
- Ideally you can use a heavy, thick bottomed pan, rather than a thin, light one. The thicker the pan (like cast iron), will be able to retain heat better than a tin pan, and transfer more of the heat into the meat, creating a better sear, in a short time
- Take the meat out of the fridge about a 30 minutes prior to cooking and season with salt, pepper, and anything else you’d like
- Heat your over high until it just starts to smoke
- Add some oil to the pan, and rotate to coat the bottom. I admit, I use olive oil most of the time, but oils with higher smoke points are a bit better to use (but not necessary)
- Lay the meat done in the pan; you should hear very aggressive sizzleing. If not, your pan was not hot enough, remove the heat and let it get hotter
- Now, perhaps, the most important part, DON’T FLIP THE MEAT. Remember we need high, direct heat, sustained over enough time. If you keep checking the meat, you ruin all three.
- Wait for at least 3 minutes…and then quickly check the meat. If you don’t yet see a nice formed crust, lay it back down, and check again in a few minutes.
- Once seared, flip the meat over, and sear the other side…same rules apply – no peaking
- Depending on the thickness of the meat, you may also want to sear the sides
- Also depending on thickness, once you’ve seared both sides, you can pop it into the oven to finish cooking, or flip it back over to finish on the stove top


Comments (6 )